QA WORKFLOW
I am Alexandru Cercel, student of the Bachelor’s Degree in Video Games by UPC at CITM. This content is generated for the second year’s subject Project 2, under supervision of lecturer Ricard Pillosu.
What is QA Workflow
It is a step-by-step workflow on how to perform tasks that “ensure” the quality of the project from the beginning to the end of the task. During the development of the game the workflow changes with the different phases that there are, therefore the tasks and priorities change as we go forward and we are asked for different feedback based on the priorities of that development phase.
To reduce errors and minimize bugs, different tools are used to help us carry out our work. The organization is very important since we have to be constantly in contact with our team and provide quality feedback so that we can polish every feature as much as possible.
What is the typical workflow of a major video game?
Proposal phase - The team brainstorms and creates a high level design doc to pitch the concept in search of funding.
Gate to preproduction - The team creates a fuller and more technical project description, they solve some tech issues, get some concept art made, schedules projections and everything els that is needed
Preproduction - A very agile, exploratory phase of development. The goals are to solve all the outstanding questions, create asset pipelines, find the fun and produce a “vertical slice” that is just a few minutes of finished gameplay.
Production - Now that you know how to make content, the team gets really bulked up, the schedule gets firmer and lots of implementation starts.
Testing - Traditionally, we made alpha versions (broken, incomplete, but winnable if only one way), beta versions (complete but buggy) and gold master candidates (we think this is the finished game - QA try to prove otherwise). Now, the versions are more incremental and can even continue to improve post launch. Still, the process is the same - clean, careful, numbered builds that go to QA for a full shakedown and hopefully a sign-off for public release.
Release support - The newly released game is beeing watched and looking forward to make a patch to solve bugs and other problems that might be founded during the release.

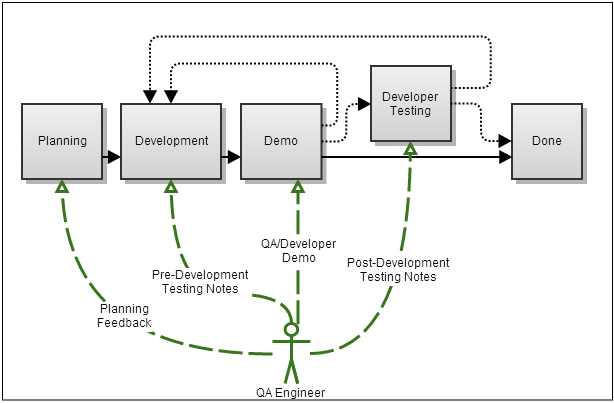
Therfore the QA invervention during the project is like this: 
Planning feedback
Occasionally, a feature will seem simple, but the QA engineer knows in advance that it will actually be very difficult. To get this feedback in as early as possible, the QA engineer attends the iteration planning meeting.
Based on this feedback, the team might choose to increase their estimates, change the scope, or move the feature further down the backlog.
Pre-development testing notes
As QA, we can often make accurate predictions about what bugs we’d find in a completed feature. If so, why not warn the developer in advance and save everyone the bother of dealing with the bug?
In order to achieve this, we introduced pre-development testing notes. They are a set of hints, written before development starts, about the type of bugs we might have expected to find in the story once it is complete. The goal is to enable the developer to avoid introducing the bugs in the first place.
Pre-development testing notes can vary significantly in size, depending on factors such as the scope and complexity of the story, the experience level of the developer, and the level of risk associated with the changes.
QA/developer demo
Once a developer is happy that they have completed a feature, he or she will call over their QA engineer for a demo session. This has multiple purposes:
To allow the QA engineer to understand the implementation details of the story, down to the code level. This informs their decisions on risks, what testing needs to be added, and what testing is unnecessary. To discuss what testing the developer has done and, what testing they still intend to carry out before they will push the changes to the repository. The demo is a discussion between equals, and not a test that the developer or story can “pass” or “fail.” However, sometimes concerns are noticed during the demo, and these get quickly noted as comments on the story. This is much more lightweight than raising issues at this stage, they don’t need to be separately tracked, assigned, triaged, resolved, or tested because they will be fixed within a few hours, while the developer is still working in his or her original context.
At the end of the demo, the QA engineer and developer will make a joint decision on what should happen to the story next. If both parties are confident about its quality, the feature is moved directly to Done.
Post-development testing notes
If either party feels that further testing is needed, the QA engineer will update the testing notes, removing any testing that’s already been done by the developer, and adding new risks based on the implementation of the feature. This eliminates duplication of effort and ensures efficient testing.
Workflow diagrams
A workflow diagram provides a graphic overview of how a specific role is done. Using standardized symbols and shapes, the workflow shows step by step how your work is completed from start to finish. It also shows who is responsible for work at what point in the process. Designing a workflow involves first conducting a thorough workflow analysis, which can expose potential weaknesses.
Workflows are also useful to help the team memabers understand their roles and the order in which work is completed, and to create more unity within different departments. Originating from the manufacturing industry, workflows are now used by a variety of industries—from government to finance to commerce—and are easier than ever to create.
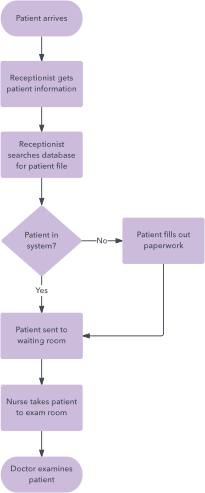
Example of a workflow diagram: 
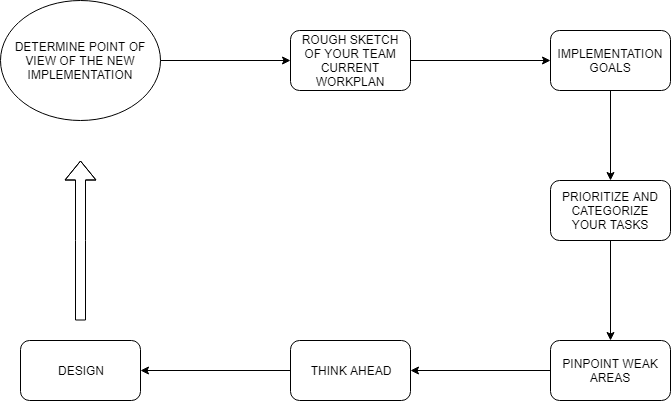
How to make a workflow diagram
To create a workflow diagram it is important to have very clear our goals, what we want to make and how our team works to cover weakpoints that delays the workflow.
Components of a workflow diagram
Input - Equipment or information that’s required to complete the step
Transformation - Development process
Output - Build

Traditional workflow vs Agile workflow
Traditional workflow
The traditional workflow is based on planing everything from the start, every process that we know we have to do is planed and it strictly needs to be done to ensure that no other process is affected. Usually it is used in big teams where the roles of each meamber are very defined, everyone knows what job they have to do, it is more focused on individuals rather than colective work. The traditional workflow is not prepared to make changes, everything has to go as how it was planed if not the project will be a fail.
Agile workflow
The agile workflow is a adaptive method where refactorization is used to build the project over what we already have improving it constanly and giving it more features. This workflow is normaly used on small teams and projects that dosent last long. There are few roles and the team is very flexible in general and the work we do is always in contact with the client so we get feedback that will improve the overall quality of the project.
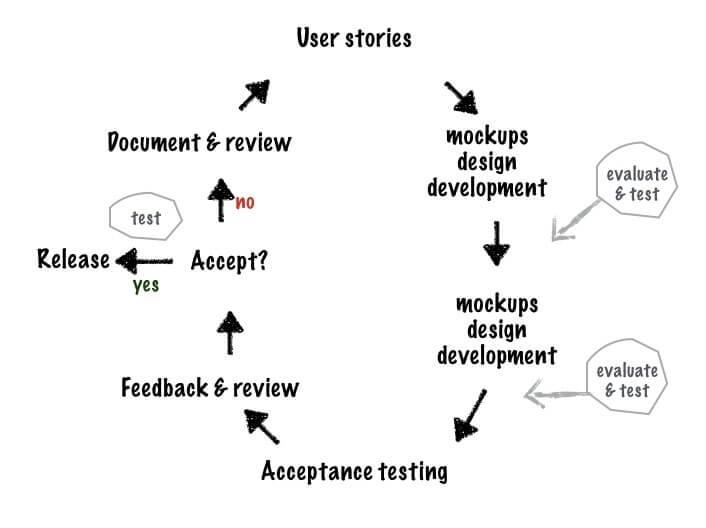
Example of agile testing workflow diagram: 
The Management of Project Uncertainty
The management of the uncertainty in the traditional management of Projects: we try to control the uncertainty of the Project so that, in the average of the possible ones, it decreases. We tried to define the entire Project from the beginning, establishing a detailed plan of the Project, with strict contracts and having controlled all the control parameters of the Project, quality, time, costs, etc.
In the traditional management of Projects: we contemplate the inherent uncertainty of the Project and establish prioritization parameters from the beginning of the Project until the end, we could have to face numerous problems throughout the Project Cycle.
The management of the uncertainty of the project in the agile methodologies: the agile methodologies propose a more adaptive model with respect to the uncertainty of the Project, in which we contemplate the refactoring model, build the Project on the already made based on adding value to the that we have already done, little by little, step by step.
Work on basic functionalities: instead of establishing a detailed plan for the entire Project, what we do is work on basic functionalities that are defined at the beginning of the Project and that, little by little, and taking into account the just in time parameter for that there are no excessive or uncontrolled points during the process, get a continuous flow to deliver the Project and establish improvements in the Project.
Stabilization Phases
During this phase, the team will execute the test plan created during the planning phase. All implementation is stoped and the only goal of the team during this phase is to solve as much bugs and problems as they can. This phase is usal done at the end of a release where the QA already tested it and fixed major bugs but that dosent mean we cant still have major bugs while this phase.
Also, debt work is also done. All the work that has to be done to fullfil the costumers request and is not done yet is completed during this phase to ensure that everything is as the costumer requested.
It is important not to get stuck in the stabilization phase, normally when a stabilization phase is long that means that the programmers are not sure of the code they have provided and therefore they ask for more stabilization time because they are afraid of the behavior of the program . More time of execution does not mean that there is more quality, you have to ensure that there is a minimum number of bugs and that all implementation is as polished as possible to ensure a margin of quality at the end of it.
Tips to improve QA Workflow
- Stay close to your team
- Break free from the classical roles and responsibilities of QA
- Categorize tasks based on Importance and Complexity
- Prioritize bug fixes based on usage
- Give full visibility into your work
- QA IS NOT PLAYING THE GAME
Sources
Contact
mail: misternyancat99@gmail.com